Getting started
Download libNIMA for your computer from its page: the -setup.exe or the .msi for Windows 10 and 11, the .dmg for macOS on Apple Silicon and Intel, and the AppImage, .deb or .rpm for Linux. It needs no Python.
Not signed yet. Windows may say "Windows protected your PC": click More info, then Run anyway. macOS may say the app is damaged or cannot be checked: move it to Applications, then run xattr -cr /Applications/libNIMA.app in Terminal. On Linux, make the AppImage runnable with chmod +x.
libNIMA is a window and a command, libnima. The -setup.exe, .msi, .deb and .rpm put the command on your PATH, so it runs from the root of any project. From the .dmg or the AppImage, Tools > Add libnima to the PATH does it. For a build server or a container the command also comes alone, in a zip: unpack it where it can stay, and run libnima --add-to-path.
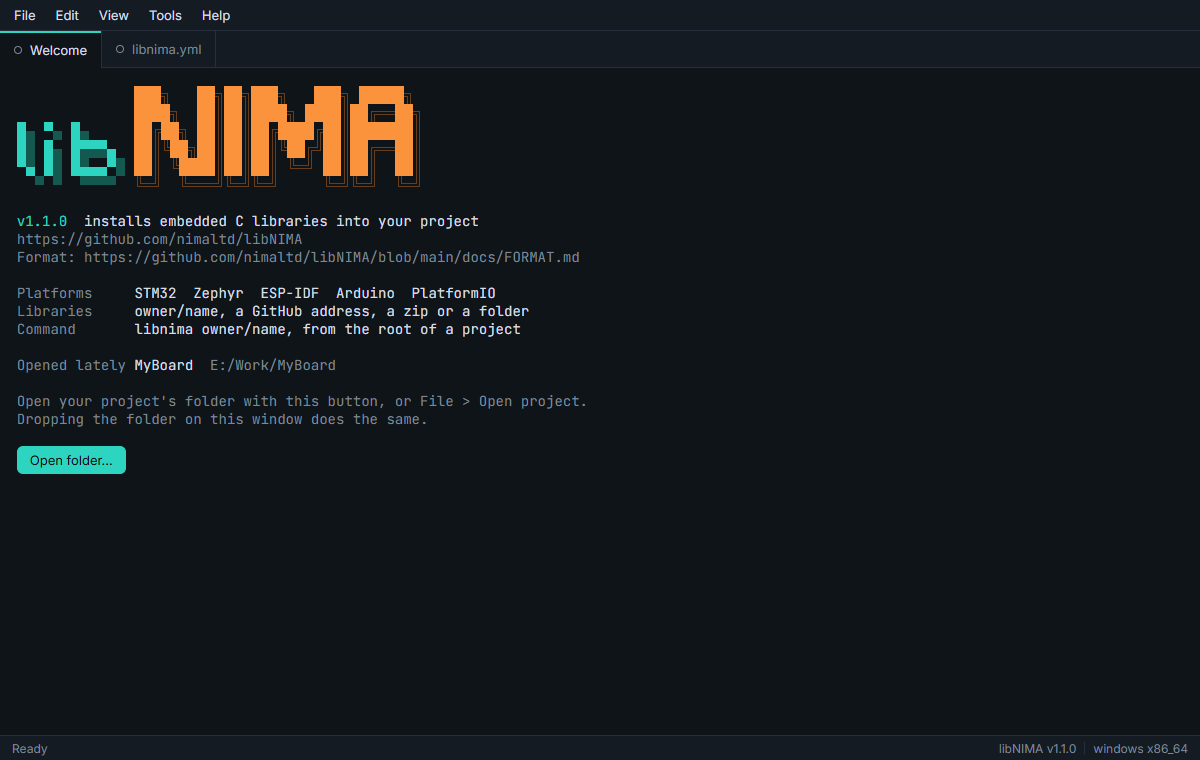
The Welcome tab says what libNIMA does, and lists the projects opened lately. Help > Check for updates looks on GitHub for a newer libNIMA.
Opening a project
Open folder, File > Open project (Ctrl+O), or a folder dropped on the window, opens your project in the Project tab. Open the folder the project lives in:
| Platform | The folder to open |
|---|---|
| STM32 | the one CubeMX made, with the .ioc |
| Zephyr and nRF Connect SDK | the application's, with CMakeLists.txt and prj.conf |
| ESP-IDF | the project's, with CMakeLists.txt and main/ |
| Arduino | a sketch's, or any, for the libraries folder of your sketchbook |
| PlatformIO | the project's, with platformio.ini |
libNIMA reads the project and says which platform it is and which file told it, such as STM32, from MyBoard.ioc, with the IDEs it found beside it. When that is wrong, Change says which it is. A folder that is no Zephyr application, ESP-IDF project or PlatformIO project is not installed into: open the right folder.
Adding libraries
Give a library in the Add library box: its GitHub owner and name, such as nimaltd/ee24, its GitHub address, or one release of it, nimaltd/ee24@v4.0.0. Zip takes the zip of GitHub's Code, Download ZIP, with no need to unpack it, and Folder a library on your disk.
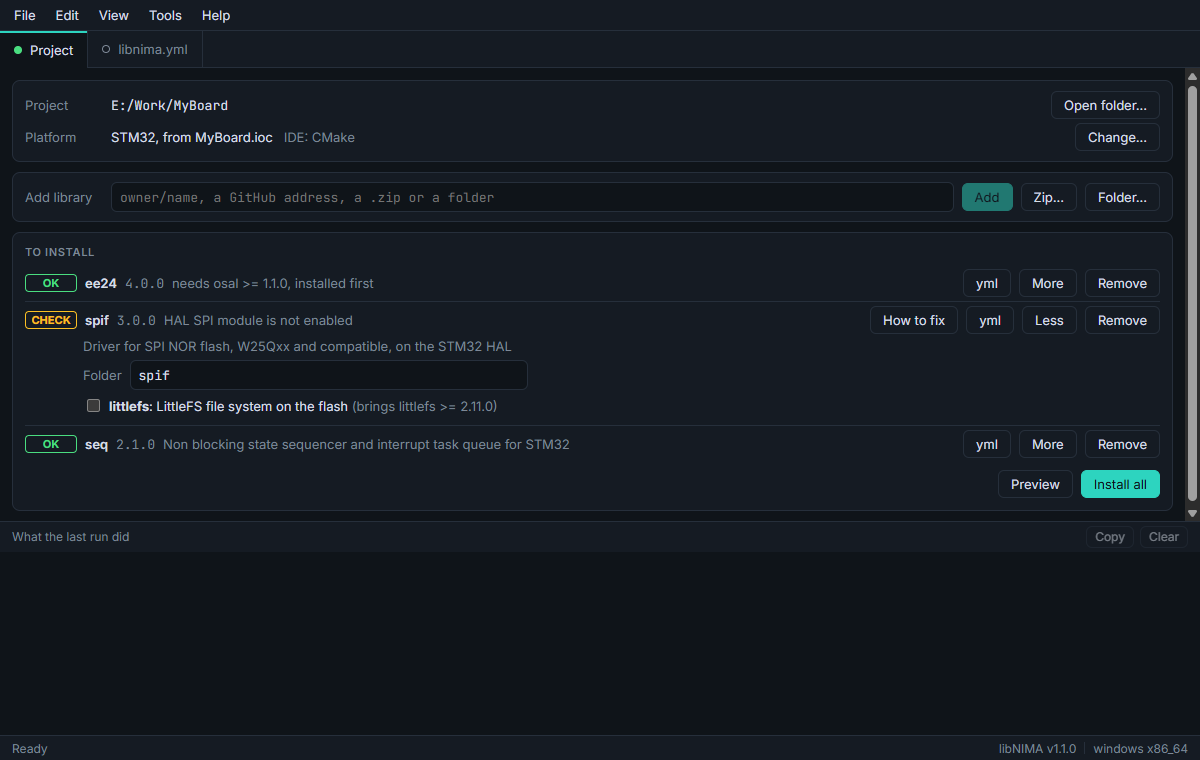
Each library joins the list To install, with its version and what libNIMA found when it checked it against your project. A library it needs is named beside it, such as needs osal >= 1.1.0, installed first, and goes in before it. More shows what the library is, the folder it goes into, and the parts of it you choose, such as spif's port for LittleFS. yml shows its libnima.yml, and Remove takes it off the list.
A library in a private repository asks for a GitHub token that can read it. It is used for that run and never saved.
OK, CHECK and NO
| Mark | What it means |
|---|---|
| OK | Nothing stands in its way. |
| CHECK | It installs, and there is something to do first, with the way to do it. Never a refusal, since a project can be laid out in ways libNIMA cannot read. |
| NO | It is not installed, and the reason is beside it: a library for another platform, one that needs a newer libNIMA, or one whose install would write over something of yours. |
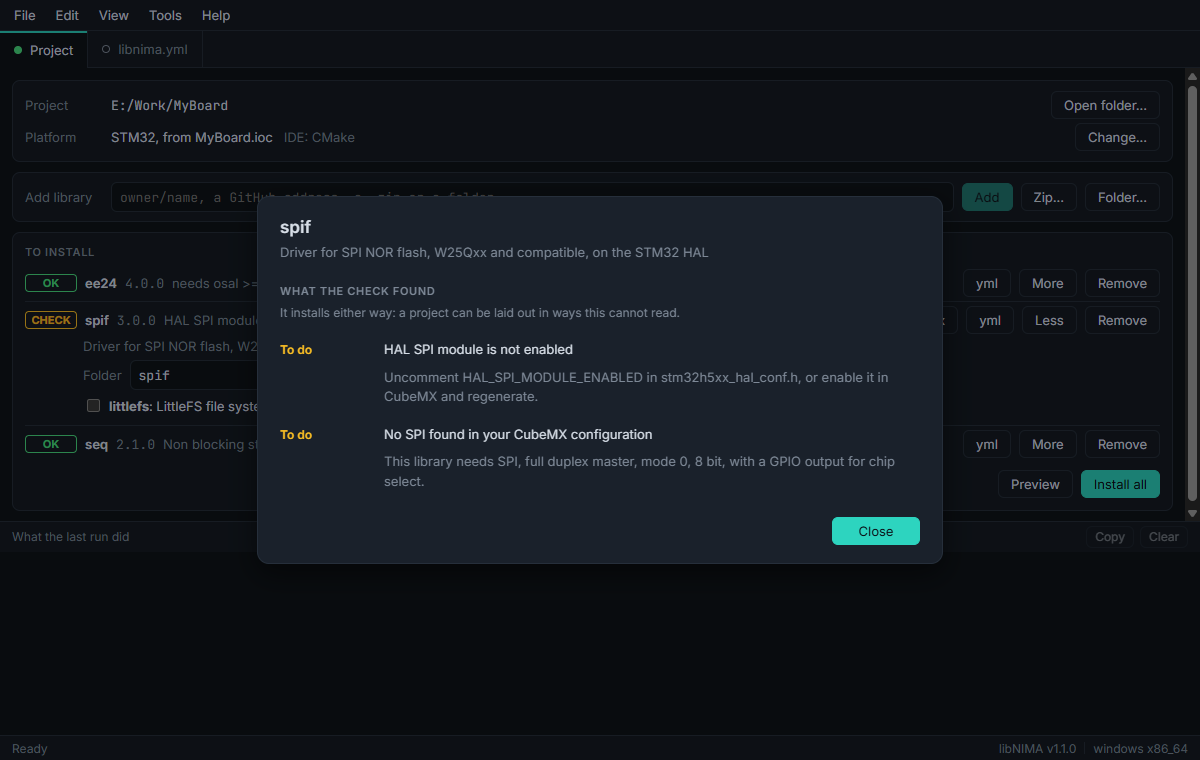
How to fix by a CHECK lists what the check found, and what to do about each, such as a HAL module to switch on in stm32xxxx_hal_conf.h, or a peripheral to set up in CubeMX.
Preview
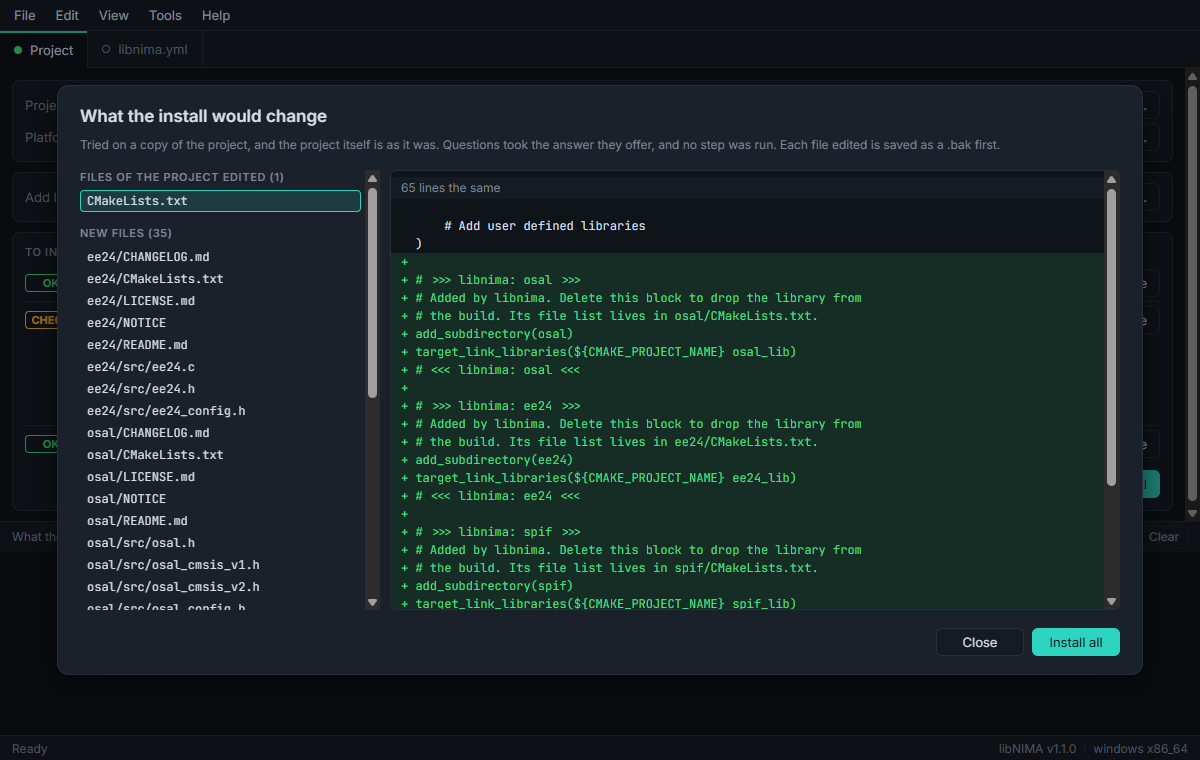
Preview tries the whole list on a copy of the project, and shows what an install would change: the project's files it edits, and the new files. Click a file to see its changes. The project itself is left as it was. Questions take the answer they offer, and no step of a library is run. Install all from there installs the list.
Installing
Install all installs the list, each library after what it needs. Every library is checked before the first is written, so a run that is refused writes nothing. Every file of the project is saved first, as a .bak with the date and time in its name.
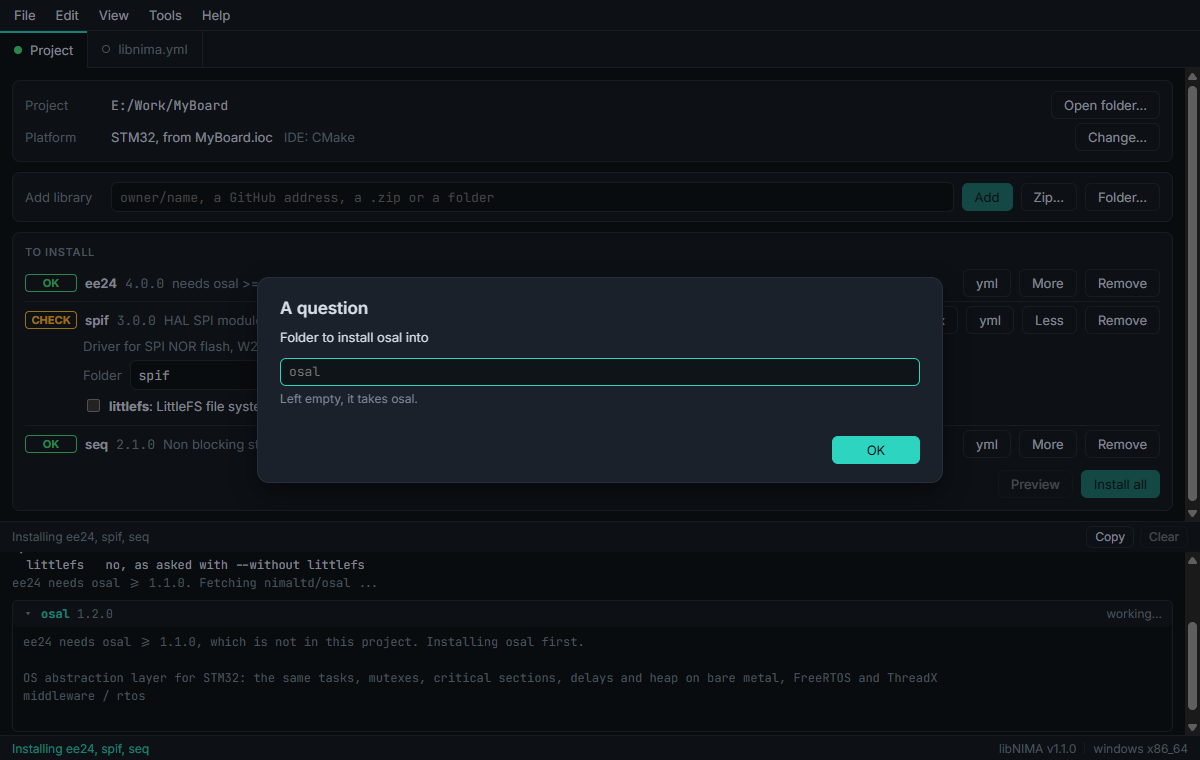
What libNIMA needs to know, it asks: the folder of a library another one needs, a part of a library you can choose, a step a library runs, shown in full before it runs.
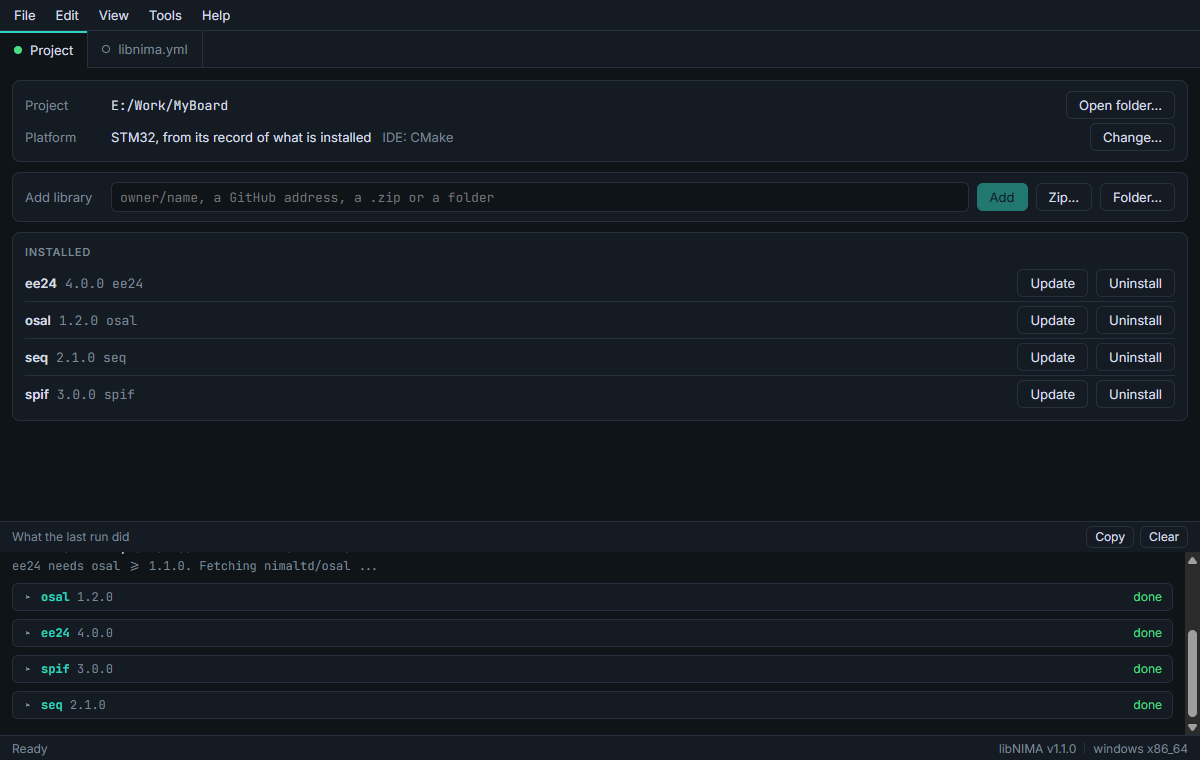
What the last run did has a part for each library, which opens and folds. Copy copies it all, to keep or to send.
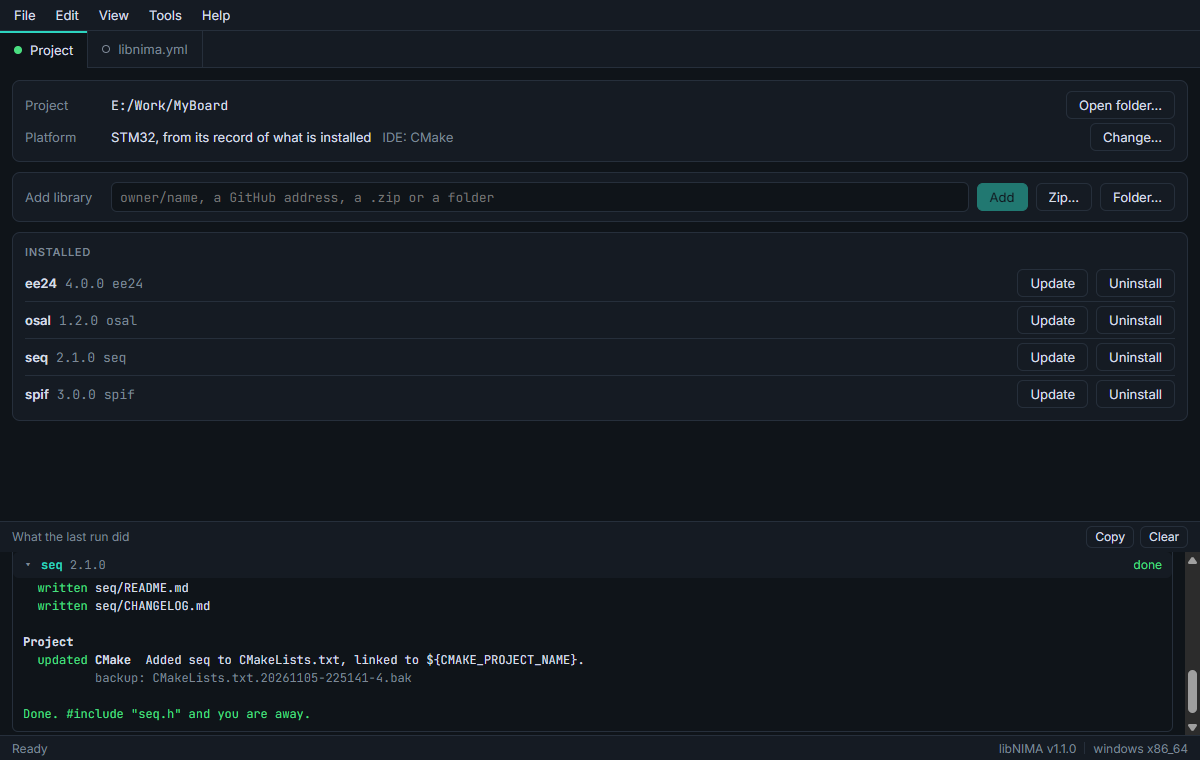
A part says which files were written, created or kept, which files of the project were updated and where their backup is, and ends with the line to #include.
Updating and uninstalling
The libraries in the project are under Installed, each with its version, its folder, and when there is one, the newer version on GitHub.
Update installs it again. What you wrote between its USER CODE BEGIN and USER CODE END lines is kept, the way CubeMX keeps your code, and anything else of yours that would be lost is saved as a .bak first.
Uninstall takes the library out of the build, every block it wrote in your project's files, and then its files. What was yours is saved first, as a .bak. A library another one needs stays, and the run says which needs it.
A library stays in the folder it was installed in. To move it, uninstall it, then install it into the other folder.
Writing a libnima.yml
A library says how it goes in with a libnima.yml at the root of its repository. The libnima.yml tab (Ctrl+2) writes one with you: Open library opens a library's folder, and New fills one in from what is in it, its headers and sources, its licence and its README.
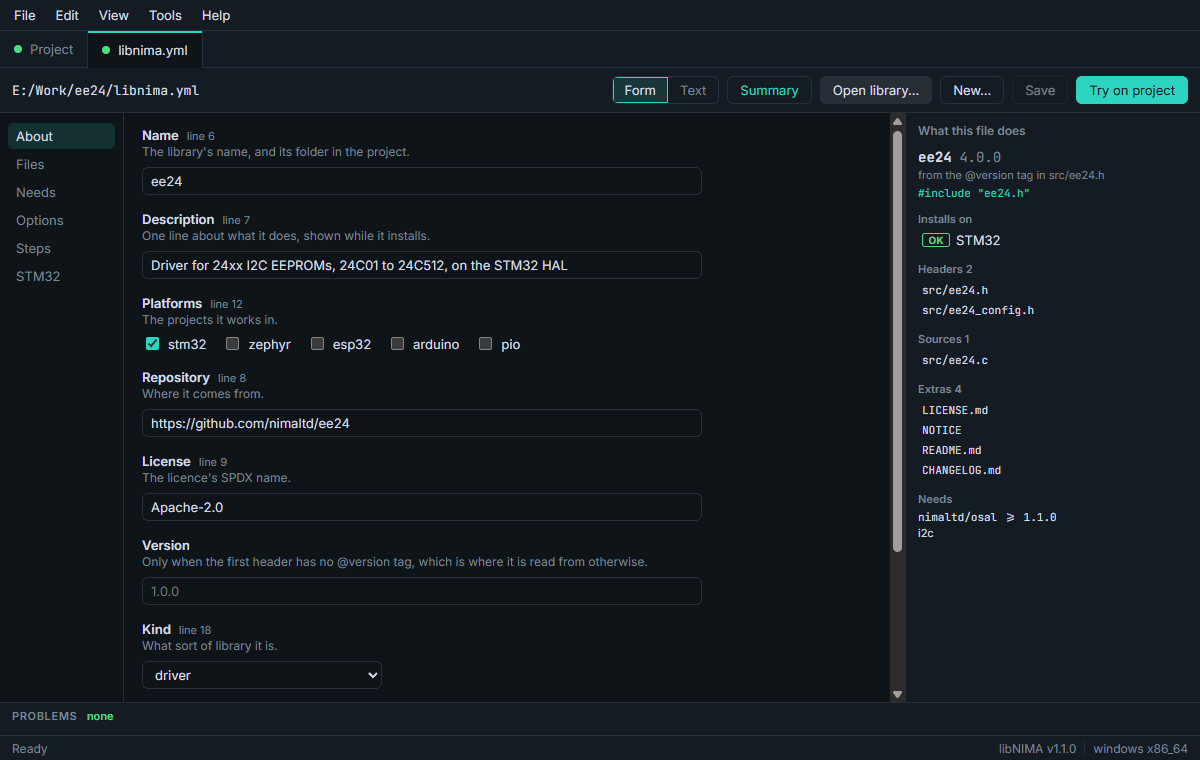
The Form has a place for every key, part by part, with a line on each and the line of the file it is on. Summary says what the file comes to: the library's version and where it is read from, the platforms it installs on, its files and what it needs.
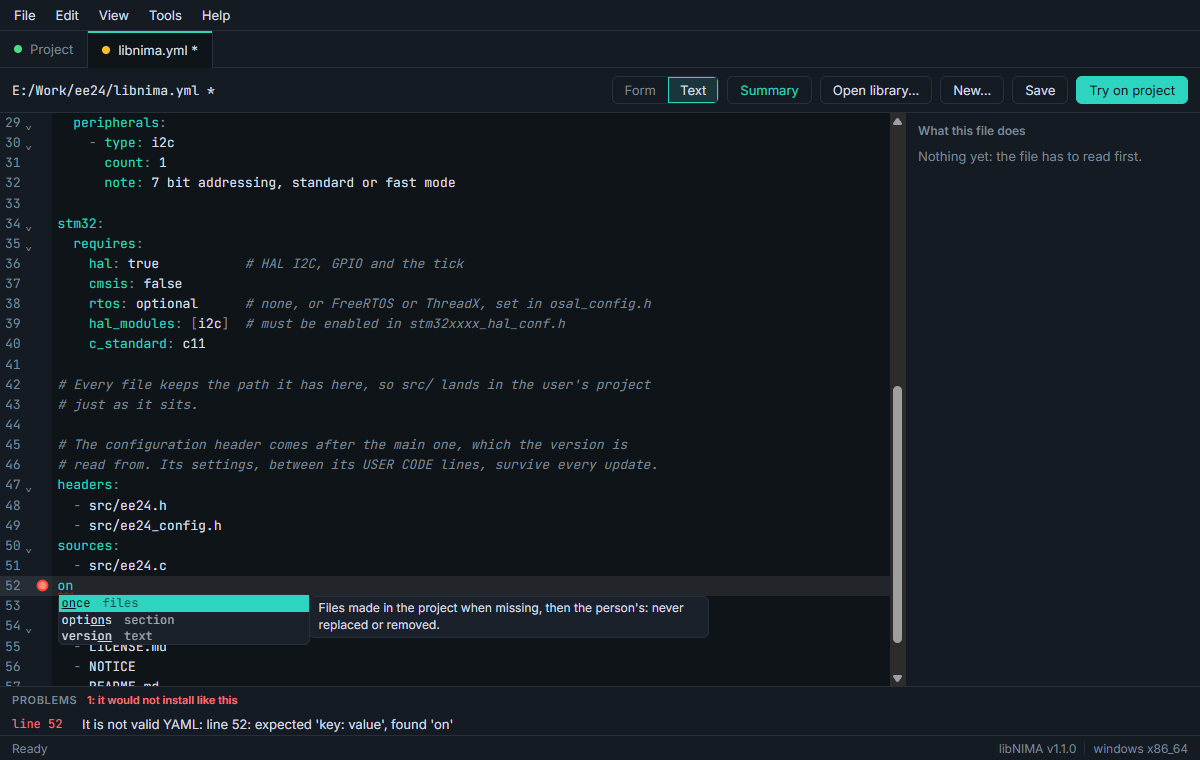
The Text is the same file. Typing offers what can go at the cursor, with what each is, and the form and the text keep each other's changes, comments included.
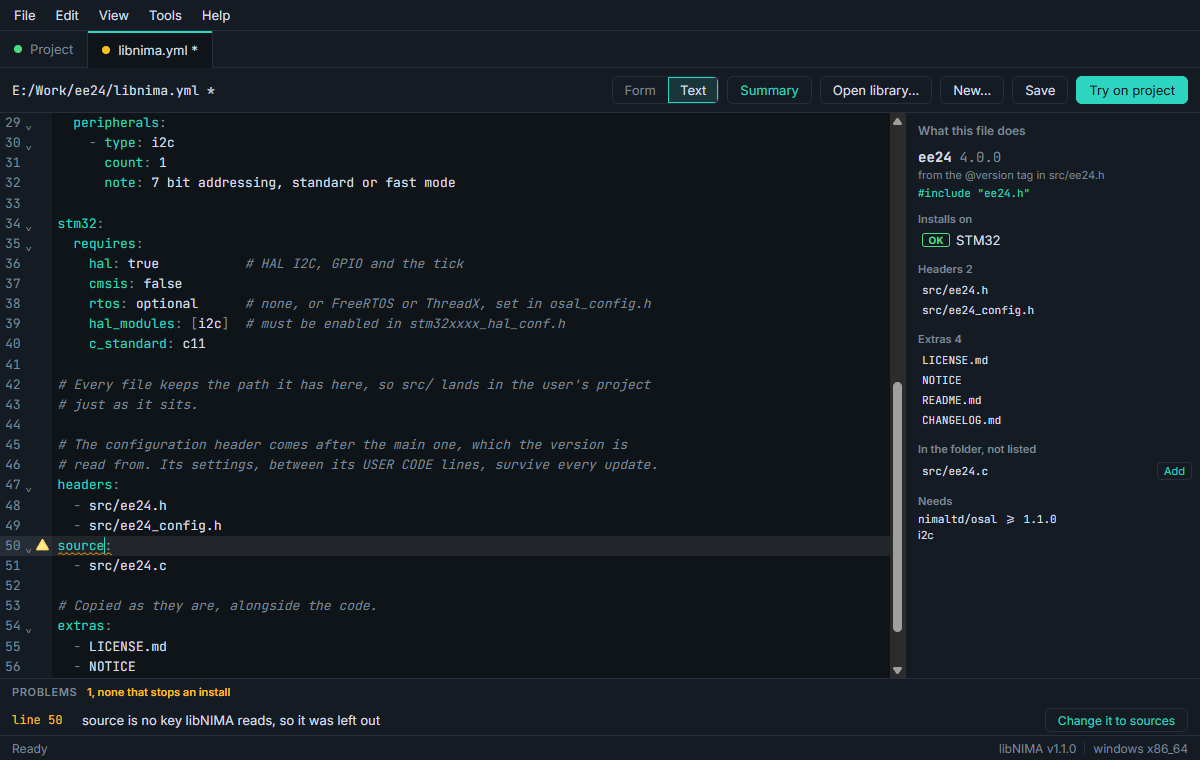
Each problem names its line, and many come with the fix a click makes. The summary also names the files of the folder the file does not list, with Add. Save (Ctrl+S) writes the file, and Try on project shows what it would install in the project open in the first tab.
Every key is on the format page. In VS Code, the YAML extension gives the same help with the line the format page gives.
The command
From the root of your project, libnima does what the window does:
| To | Run |
|---|---|
| Install or update a library | libnima nimaltd/ee24 |
| One release of it, a branch or a commit | libnima nimaltd/ee24@v4.0.0 |
| From a zip or a folder | libnima D:/Downloads/ee24-main.zip |
| Check it against the project, and write nothing | libnima nimaltd/ee24 --check |
| Into a folder you choose | libnima nimaltd/ee24 --dir Libs/ee24 |
| Take a part of it, or leave it out | --with littlefs, --without littlefs |
| Take every answer offered, for a script | --yes |
| Uninstall | libnima --uninstall ee24 |
| Check a library's libnima.yml, for its CI | libnima --lint |
| Open the window on this folder | libnima --gui |
| Every option | libnima --help |
The README has every command.
Each platform
| Platform | What libNIMA does there |
|---|---|
| STM32 | Adds the library to CMake, STM32CubeIDE, Keil MDK, IAR or CubeMX's Makefile, every one it finds, and checks the HAL modules, peripherals and RTOS it needs. |
| Zephyr | Makes the library a Zephyr module, adds it to the build and switches it on in prj.conf, with its settings in Kconfig. |
| ESP-IDF | Makes the library a component, with its settings in menuconfig and the symbols it needs in sdkconfig.defaults. |
| Arduino | Puts the library in your sketchbook's libraries folder, or one sketch's src, with its library.properties. |
| PlatformIO | Puts the library in lib/ with a library.json, and its defines and flags in platformio.ini. |
Each platform's guide has the rest.
Private repositories, proxies and no internet
A private repository. Make a GitHub token at github.com/settings/personal-access-tokens that can read it, with Contents set to Read-only. The window asks for it; the command takes --key, or GITHUB_TOKEN or GH_TOKEN set to it. It is never saved, and is sent to GitHub and nowhere else.
A proxy. Set HTTPS_PROXY, such as http://127.0.0.1:10809. A file that does not arrive is tried again, and every file is fetched before anything is installed.
No internet. Download the library's zip on a machine that has it, and give libNIMA the zip, with the zip of each library it needs beside it. Forget one, and it stops before writing anything, naming the zip it is missing.
Settings and the keyboard
Tools > Settings has the theme, the check for a newer libNIMA, and the check for newer versions of the libraries installed. View > Command palette (Ctrl+Shift+P) finds any command by part of its name.
| Do | Keys |
|---|---|
| Open a project | Ctrl+O |
| The Project tab, the libnima.yml tab | Ctrl+1 Ctrl+2 |
| Save the libnima.yml | Ctrl+S |
| Command palette | Ctrl+Shift+P |
On macOS, Cmd takes the place of Ctrl.
When something goes wrong
- It says the folder is a git repository. A clone of a library inside your project is not installed where it stands, since that would take its history. Install from a copy outside the project, or from GitHub.
- A file of yours is where the library's would go. Nothing was installed. Move or rename your file, or give the library another folder.
- It is not a Zephyr application, ESP-IDF project or PlatformIO project. Open the folder that holds
CMakeLists.txtandprj.conf,main/, orplatformio.ini. - A library needs a newer libNIMA. Help > Check for updates, or download the latest from its page.
- GitHub did not accept the token, or cannot see the repository. The token has expired, has no Contents: Read-only, or the repository is not among those it can read.
- It says installed, and in no build yet. libNIMA found no IDE it could add the library to: add it by hand, as the run says.
- Anything else: ask, or report a bug on GitHub.